How To Part 1: Prep & Weaving

Online guide to complete an Eric Taylor Basket Kit
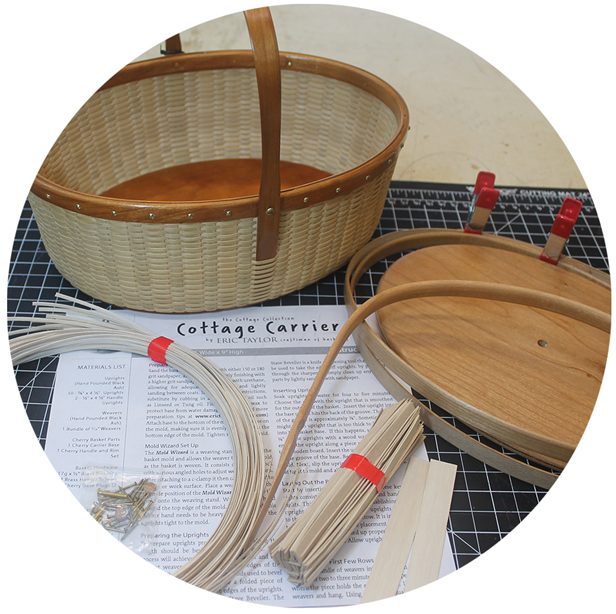
A comprehensive online guide and video tutorials on how to make an Eric Taylor Basket from your kit. It is specifically for the Cottage Collection— woven on a mold with a base (Not for woven bottomed baskets). Along with the directions that come with each kit, the following photos, instructions and videos from Eric himself should give a person everything they need to successfully make one of his baskets.
I'm Eric and I teach the craft of basketry.
This step-by-step will show the process for the Cottage “Classic” Carrier Basket. It is one of my earlier designs and is still one of my most favorite baskets. Since all of the steps to making my baskets with a base are the same, you will be able to follow along and apply it to the specific basket that you are making. In addition to the photos and text, you can view a short video of certain steps that can be replayed to fully understand the process.
If you are a beginner to my style of baskets, the Carrier is a good place to start. After completion, you will have learned the skills and techniques to move forward to more involved baskets from my entire collection. If you take your time and read each step as you go and watch my videos, I’m positive you will have great success.
First, you will need some tools...
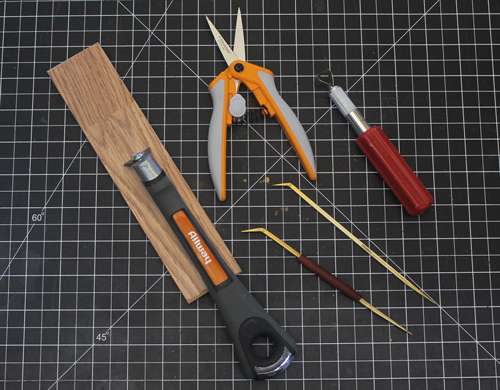
I am going to break up the tools into two categories: the tools that you will need to weave the basket and tools needed to finish your basket. First section is the weaving tools. When we get to the handles and rim sections of this “how to”, I will list the tools needed for finishing your basket.
Tools for Weaving
There are some tools that you are going to need to have and then there are some tools that it would be nice to eventually have if you continue to make a lot of my baskets.
Weaving tools you need to have...
Sharp fine-pointed scissors. Small Fiskars Fabrics Easy Action are what I use and are the best for small to medium-sized Black Ash baskets. You will need something to thin the ends of weavers. Wood scraper, X-Acto with correct blade or knife to thin the ends of weavers. I use Allway brand carbide paint scraper. Also, a hardwood board to scrape on (any piece of scrap or a plastic cutting board will do). Lastly, a small flat tipped packing tool will be needed.
Tools that would be great to have...
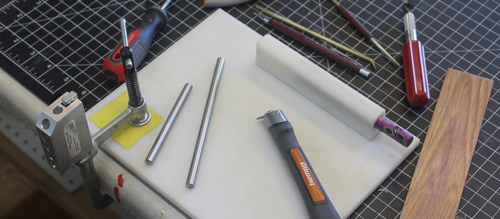
If you will be making more of my baskets, these tools I highly recommend. A weaving stand is not a necessity, as you can weave on a hard surface or on your lap. However, it 's extremely helpful as it holds the basket mold and allows you to turn the mold freely as you are weaving. I invented a version that is made of metal and attaches to a table via c-clamp, called The Mold Wizard.
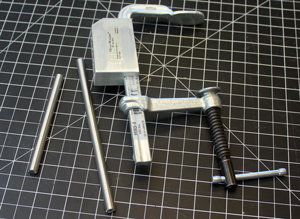
Hot Tip! For the adventurous, you can make a weaving stand at home. Drill several 5/8” holes at different angles into a block of wood. Clamp the block to a table or workbench. You will need a 3/8” dowel to attach the mold in your homemade weaving stand.
The Stave Beveller is good for beveling the edges of the ash uprights and for scraping as well. There is a video showing how to use this.
After years of folks asking me about how I get the finish that I do, I wrote a small 16-page booklet of all my sanding and finishing tips. It is included in my Finishing Kit which contains everything I use on my baskets: gel varnish, basket oil, wax, sandpaper and wiping cloth. You can purchase the booklet separately as well.
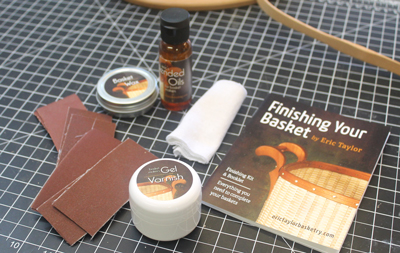
If you want to take your finishing to the next level, I highly recommend purchasing a Micro-Mesh Ultra Flex Cushioned Abrasive Kit. It contains 9 double sided foam centered sandpaper pads. These are super fine grits and last a real long time.
Preparing Materials
My baskets are made 100% from American trees. With woods such as Black Ash and Cherry, this means there is sanding involved to maximize the natural beauty of this material.
Now it’s time to sand your basket’s base, rims and handle or ear handles, depending on your kit. Starting with one 180-grit sandpaper and then progressively working your way up with a higher grit sandpaper.
Coat all sanded parts with a gel polyurethane allowing for adequate drying time and lightly sanding between coats. I like to at least have two coats on the base before weaving. If you have time restrictions, substitute by rubbing in a quicker drying oil, such as Boiled Linseed or Tung oil. You can find my recommendations for general finishes and gel topcoats here, especially if you like to buy in bulk.
Preparing the uprights...
Watch video above on preparing your uprights using a Stave Station with beveller. To increase window while viewing, hit the small double box icon in top left corner. If it remains small, hover over a corner and it will let you expand window size.
Getting your uprights in prime shape to place into your basket base takes some time. To prepare your uprights properly, the edges along the length should be beveled or rounded over. This process will achieve a tighter woven basket and will prevent weavers from fraying when rubbing up against the edges of the uprights while weaving.
There are a couple of methods to bevel uprights. One is to use a folded piece of sandpaper (180 grit is good) and sand along the edges of the upright or angle the sandpaper along the upright’s edge. Three or four swipes should do it.
Another method is to use a Stave Beveller which is a knife sharpening tool (available in the Shop). Pulling uprights through the blades takes the edges off nicely. Simply clean up any frayed parts by lightly sanding with sandpaper. Tip: the Stave Beveller is the best knife sharpener around!
Special note about your Black Ash materials...
The weaving materials in your basket kit are hand-pounded American Black Ash. This tree, along with the more common White Ash, are being decimated by the infestation of the Emerald Ash Borer from Asia and is becoming increasingly more difficult to find. Over the last few years I have been trying to harvest as much Black Ash as I can from Wisconsin (video below of one of my last visits to harvest).
So, to show respect for this wood, it is even more important for us to do the best job possible when preparing these materials.
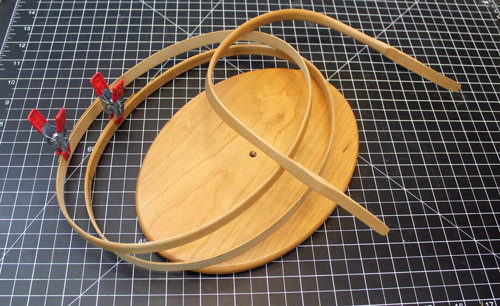
Getting the Uprights in Place
You are now ready to attach the mold and insert all your uprights. This is a crucial step as it’s the main structure for your entire basket.
Inserting key base uprights...
Every kit that I send out has a set of plans with a diagram of the placement of the uprights for your particular basket, that you are making. You will find this diagram called Laying out the Basket Base at the bottom of the directions’ front page.
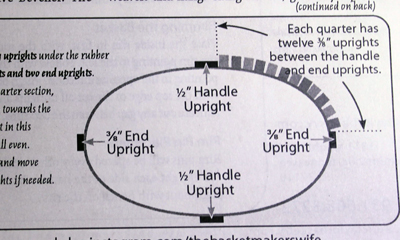
Note: Some baskets will have a handle going the short way of the basket and some may go the long way. Other styles may have end type handles called ear handles. Therefore, you are going to need to look at your particular Laying out the Base Diagram to know where and how many uprights to insert in your sized base.
Using my Mold Wizard (or other weaving stand), place a weaving post in the top-hole position. Center base on the mold, making sure it is evenly lined up all around with the bottom edge of the mold. Add washer and screw to the mold and tighten. Place a large strong rubber band around the mold a half inch from top edge of mold.
Most importantly, first start by inserting the key uprights. These key uprights consist of the handle uprights, center uprights or end uprights depending on your basket’s layout. Take your time centering the placement of any handle uprights. If these handle uprights are not lined up properly the handles will end up being off center. Tuck the key uprights under the rubber band and allow to dry.
Watch video above on inserting the key base uprights. To increase window while viewing, hit the small double box icon in top left corner.
Tips on Inserting Uprights
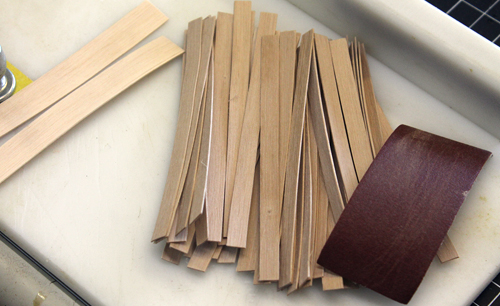
Soak uprights in water for three to five minutes. Take out of water. Choose the side of the upright that has the cleanest side for the outside of the basket. When inserting an upright into the base, make sure it is inserted deep enough into the base. Not placing them far enough in the base could lead to them pulling out later when weaving. Depending on the size, the groove depth in the base is about 3/8” deep. You should feel the upright hit up against the back of the groove when you push it into the base. Sometimes there might be an upright that is too thick to be inserted into the base. If this happens, place a piece of 180 grit sandpaper on a hard surface and sand the last ½” of the upright. I use a piece of sandpaper spray-glued to a small block of wood. When thinning the upright tips, if needed, push down—sanding side to side. When re-inserting the upright, wiggle it side to side as you are pushing it in until it hits the back of the groove inside the base.
Inserting first quarter of uprights...
Watch video above on inserting the first quarter of uprights into your base. To increase window while viewing, hit the small double box icon in top left corner.
Note: I don’t tuck the uprights under the rubber band until all uprights are in for that quarter section because you will not get your spacing right on the first try. Wait until they are all in for first quarter and then adjust the spacing when uprights are straight out. Before moving onto next quarter, tuck first section all in.
Choose one quarter section of your basket. Fill this section according to your kit’s Basket Base diagram on your instruction sheet.
Once all uprights are in for that quarter and you have evened out all the spaces between the uprights, then tuck them under the band one at a time. If it has taken you some time for this step and the uprights are feeling dry, dab water on them with your fingers before bending under the band.
If you are making a basket that is of an oval shape or one that has sharper corners, you may have some uprights that need to be tapered next to the key uprights you inserted in prior step. Again, you will refer to your particular basket’s directions. Once you have placed and tucked one quarter, move on to the other three quarters. Rubber band the bottom of the basket and allow to dry overnight.
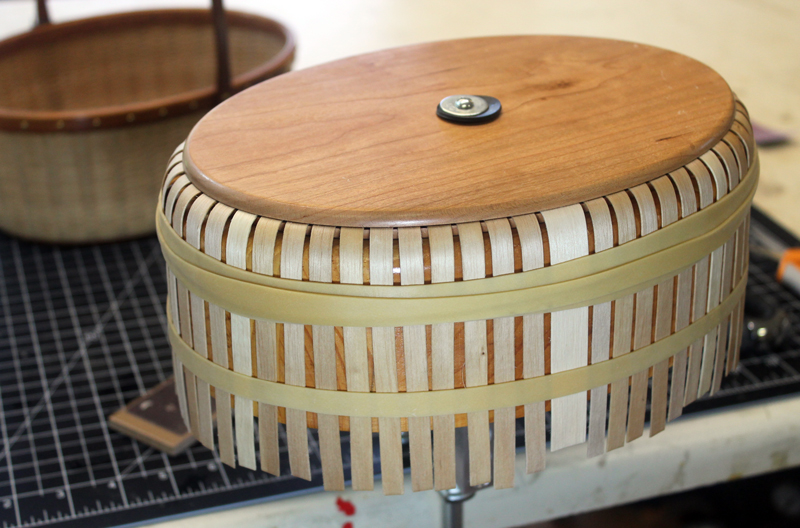
This shows all uprights in, tucked and ready to dry.
Click on image for larger view.
Let's Start Weaving!
Important note: Before you start weaving, double check your number of uprights in each quarter. For our chase weave, you will need to have the same number of uprights in each quarter.
Weaving the first few rows...
The first few rows of the basket are essential in setting up the proper foundation for a quality basket. All of my baskets are woven using the Chase Weave method. If you are not familiar, it is a weaving technique that uses two weavers in your basket at once. Baskets with an even number of uprights must be woven using this method.
First, place bundle of weavers into the water with the tape still on for three or four minutes. Cut the tape off except for where the tape holds all the ends together. Unravel the weavers to straighten them out and hang the taped end on a hook.
Finding the Satin side: You will notice that the weavers should still have a natural curl. The upper side of the curled ash is called the satin side. This will face towards the outside of the basket.
Take one weaver and taper one end. The longer the taper the better. Taper length will vary depending on the size of the basket and the width of the weaver. It will be anywhere from about 2” to 4” for small and medium sized baskets. You can refer to your specific directions that came with you kit for guidance.
In this video I show you how to start the first two rows of Chase Weaving. Note: it shows me starting the weaver to the right. If you are left-handed, reverse and start the weaver on the other side of the basket.
I begin by tapering towards the end of the weaver. If you feel more comfortable cutting from the other direction, that is fine too. Do not taper the last one inch or so narrower than half the width of the weaver. The reason for this is to leave enough integrity when placing the weaver’s tip into the base. For the first three or four rows you will need to weave with the rubber band on. Work with the weaver wet especially during this time. You can apply water with a small sponge or your fingers. Do not use a spray bottle as we want to keep the uprights dry.
Weaving with the rubber band on...
It can be a little tricky weaving with the rubber band, but you need to lock in the uprights before removing it. Taking the end of the weaver and threading through can be frustrating as the weaver easily gets twisted. Study the video for the easiest method of getting the weaver threw without twists. Once you understand how to loop the weaver the correct way, you will love this method.
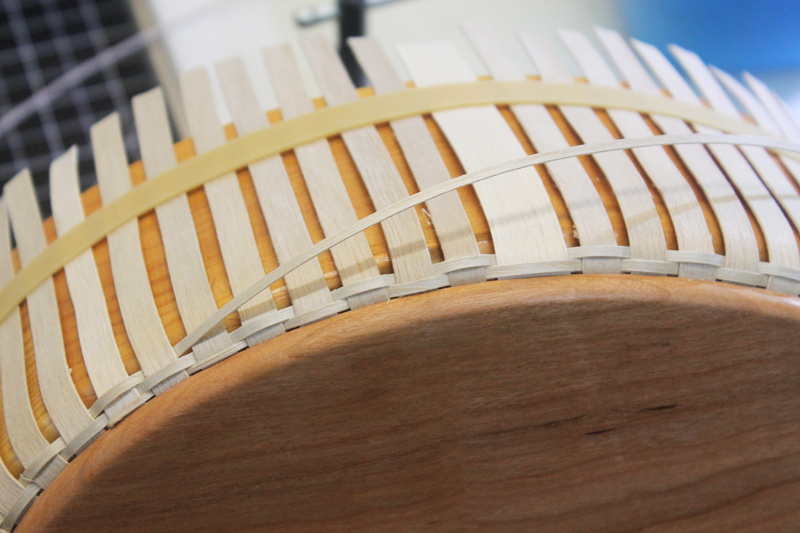
Next, continue weaving to the opposite side of the basket. You are not weaving all the way around the basket, just halfway. This is where you will add your second weaver. Taper the second weaver just the way you did the first. The second weaver is started immediately after the first weaver ended. That second weaver is placed in the base slot and over the first upright. Now that both weavers are in the basket, continue weaving with the second weaver until it catches up with the first weaver. You are now chase weaving. Keep alternating weavers when you catch up to the other. When you have woven three to four rows take the rubber band off.
***Important: Only take the rubber band off if the uprights are totally dry. You may have gotten water on the uprights while weaving the first few rows. Place the rubber band back on the basket and allow the basket to dry. When you are ready to weave, take the rubber band off. With fingers or sponge apply water to the two weavers. Make sure to wipe off your hands of any excess water. Wet hands touching the uprights will allow the uprights to pull away from the mold thus making it harder to get it tight to the mold. You may begin pulling on your weaver as you weave, adding water to the weaver only as needed. As you weave above the curvature of the mold it should begin get tight to the mold.
Adding new weavers...
When one weaver ends a new weaver must be joined by overlapping the last. Thinning the ends of these two weavers will make this transition less apparent.
Use a wood scraper to reduce the thickness of the ending weaver and the beginning of the new weaver. Using light strokes, scrape the backside of the weaver for the length of what it will take to overlap the uprights. The overlap is the length of four uprights. On miniatures you can overlap just two uprights.
Note: This may take several times to get it in place. It gets easier as you continue adding more weavers.
Weaving the basket...
Once you have added on new weavers and your rubber band is off, its time to apply tension to the weaver. As you weave pull on the weaver and push the uprights against the mold. Again, apply water when needed but keep the uprights dry. As you weave pay careful attention to the spacing of your uprights and the straightness. Uprights tend to slant in the direction that you are weaving. Once you are up halfway on the mold it is difficult if not impossible to get them back straight. Keep each row as close to the previous row as possible. As you weave you may start to see space develop between the rows. The baskets weavers are drying and shrinking, this is totally normal. When the whole basket is woven and dried this will be packed down. Weave until you reach the top of the mold. Don’t cut off any of the weavers if you have extra.

Weaving Tips:
- Weaving with an ample amount of water when the basket still has the rubber band on will help prevent the breakage of weavers.
- When weaving it is easy to lose track of the straightness of your uprights. It is a good idea to step away from the basket every now and then and look at it straight on. Make upright adjustments often.
- Avoid getting water and any portion of the basket that is already woven. Allowing the uprights to dry will make it easier to get the basket tighter to the mold. No spray bottles.
- Running a folded piece of sandpaper down the length of weaver before putting into your basket will make it that much nicer.
- Once the rubber band is off, try using less water. Gage the dryness with your fingers and add water just when it feels like the weaver is starting to get dry.
Marking for leveling...
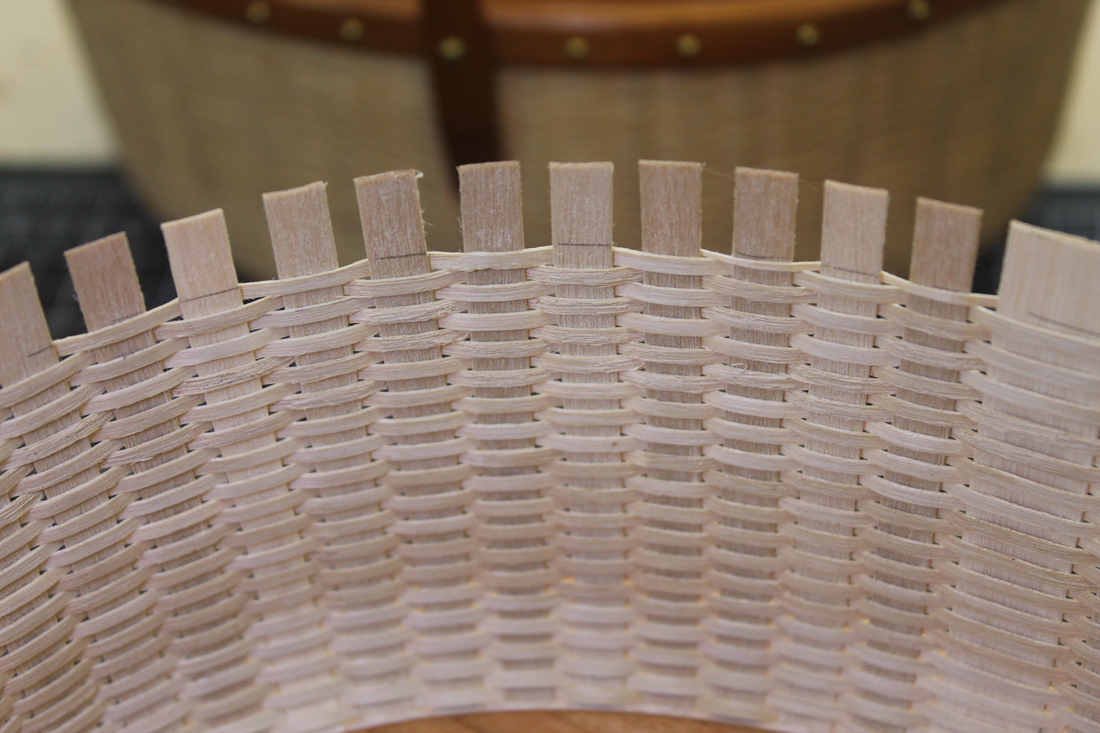
Marking the Uprights: This is a critical stage as you want to make sure your basket is level and your rims go on properly. Using a mechanical pencil (or a recently sharpened pencil), run it along the top edge of the mold, marking the inside of the top uprights. It is important to have it as tight against the top of the mold along all the inside of your uprights as you possibly can. This line will be the eventual finished height of the woven portion of your basket.
Identify the inside rim and place on top of the mold and up against the basket’s uprights. Carefully mark another line on every upright along the top of the rim.
Cutting the Uprights: Take the rim out and cut a straight line slightly below your pencil line. Remove the screw from the mold and hold the basket upside down with cut uprights about 2 inches from the surface of the table. Drop basket and the basket will pop off the mold.
Note: In this clip, my weavers ran out right before getting to the top of the mold—happened by chance. Usually, you will have extra weavers that will go past the top of the mold. Do not cut these weavers off. You will use what is left of the weavers once the basket is dried and packed.
Drying and packing...
Drying: Your basket needs to fully dry before packing. Simply let it sit overnight. However, if you’re excited and don’t want to wait, turn your oven on until it’s warm. Then turn the oven off and place basket in for 30 minutes.
Packing: With fingers, or gently using a flat packing tool, pack weavers down by starting at the base. I like to take 4 or 5 rows and spiral may way around the basket until I am all the way up the basket. You will notice that your basket has shrunk—don’t panic. Depending on the size of the basket, it could shrink ½” to 1″. Slip the basket back on the mold (you do not need to screw back on). Continue weaving and adding weavers if needed. It is ok to use a little water on these weavers. Weave back up to the top edge of the mold. Pop basket off the mold.
Final leveling!
The final step in the weaving process is to figure out where to end the two weavers that best levels the basket to the pencil line. These last two weavers are tapered real thin towards the ends.
It is not important where they end. What is important is that they are perfectly level with the pencil line. Cut off both weavers and taper to level with that line.
(click on photo for close-up of marks)
You are now ready to finish your basket!
Now that your basket is level and the two last weavers are tapered and woven to the end, its time to attach the rims. Make sure there are two to three coats of finish on your rims before proceeding.